Google Pay™
In a nutshell
Allow customers to securely make payments using Google Pay on Android devices and most browsers.
Google Pay compliance
By enabling Google Pay on your integration, you agree that all transactions processed through Paystack comply with the Google Pay and Wallet API Acceptable Use Policy and the Google Pay API Terms of Service. If you display Google Pay branding on your own surfaces, use only approved assets that comply with the Google Pay Web brand guidelines.
Google Pay is available on most browsers (Chrome, Microsoft Edge, Brave, Safari, and Firefox) across desktop and Android. Paystack currently supports Google Pay for web merchants only, including on Android devices via Chromium browsers.
Paystack accepts two Google Pay authorization methods, both enabled by default. Here are the major distinctions between the two:
CRYPTOGRAM_3DS: the card is already device-tokenized and authenticated via the phone's biometrics (fingerprint/face). Card networks treat that on-device authentication as equivalent to running 3DS, so Paystack doesn't need to run a separate 3DS challenge.PAN_ONLY: the card is just a stored card number with no device-level authentication behind it, so there's no built-in equivalent. Paystack runs an explicit 3DS step-up on every one of these charges.
For cards issued in Nigeria, Ghana, Kenya and CIV, they use PAN_ONLY. South Africa cards can use both.
When the sheet loads, Paystack prioritises CRYPTOGRAM_3DS for Android and Chromium, and falls back to PAN_ONLY everywhere else.
Paystack configures this list, known as Google Pay's allowedCardNetworks, directly. Merchants don't set it themselves. Visa and Mastercard are the only networks currently supported.
Google Pay web resources
For a deeper technical reference, see the Google Pay Web developer documentation. Before going live, review the Google Pay Web integration checklist and brand guidelines.
Activating Google Pay
You can configure the Google Pay channel for your web app on the Paystack Dashboard.
Go to the Payments settings page and check the Google Pay option under Accept payments via.
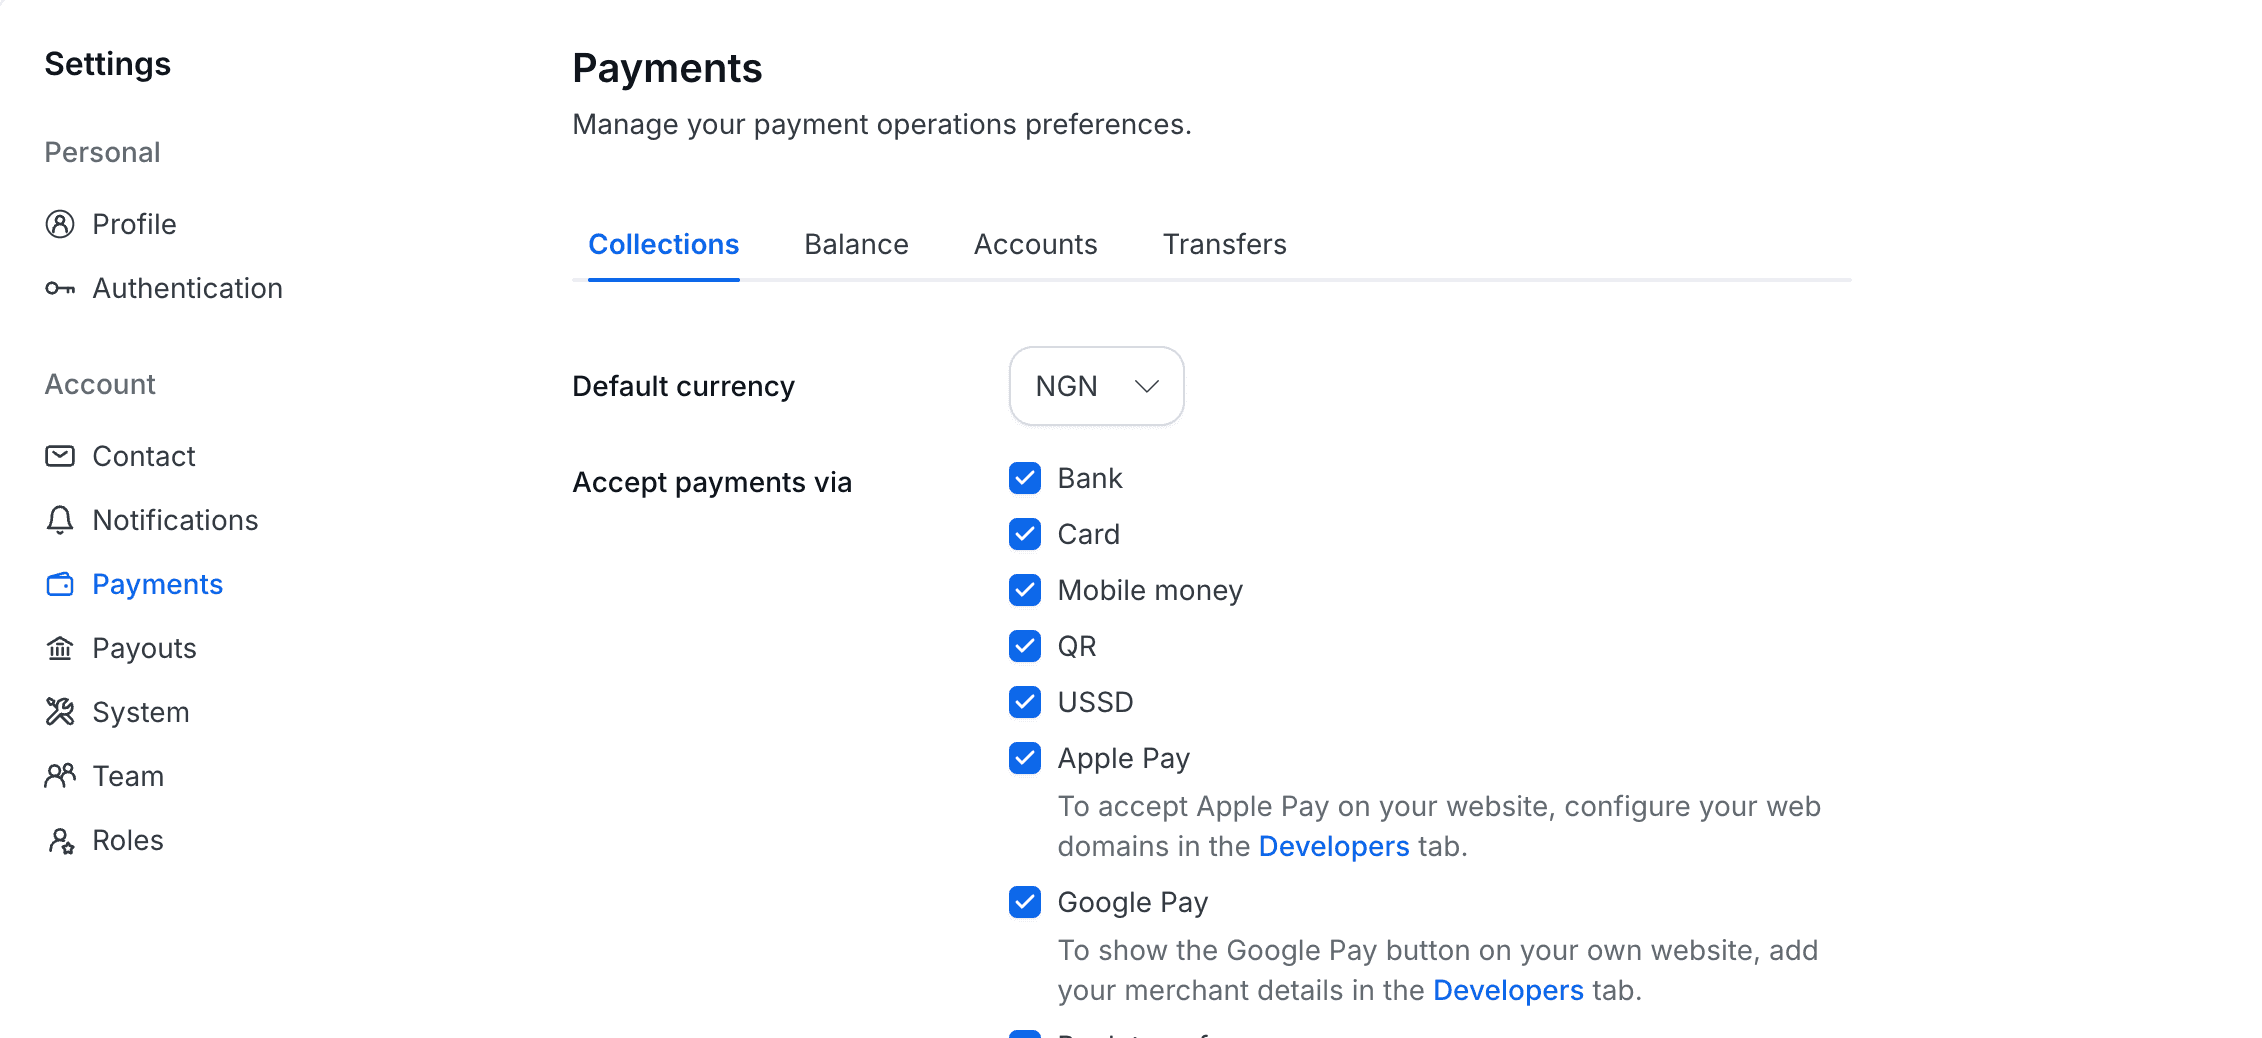
Card channel required
Leave Card enabled alongside Google Pay. Google Pay runs on the card channel, on the checkout.
If you use Invoices, Payment Pages, Storefronts or any plugin that redirects customers from your site for payment, Google Pay becomes available once enabled.
Setting up on Popup
Compatibility
Google Pay works on version 2 of our InlineJS only. If you are using version 1 follow this migration guide before proceeding.
There are two ways to set up Google Pay in your frontend app:
- Using the checkout modal
- Mounting a payment request button
Using the checkout modal
This method doesn't require any additional HTML elements, since Paystack does the heavy lifting for you. Tie your payment button to the checkout() method:
1const paystackPop = new PaystackPop();23async function payWithPaystack() {4 await paystackPop.checkout({5 key: 'pk_domain_xxxxx',6 email: 'example@email.com',7 amount: 10000,8 onSuccess: (transaction) => {9 console.log('Transaction: ', transaction)10 },11 onCancel: () => {12 console.log('Pop up closed!')13 }14 })15}
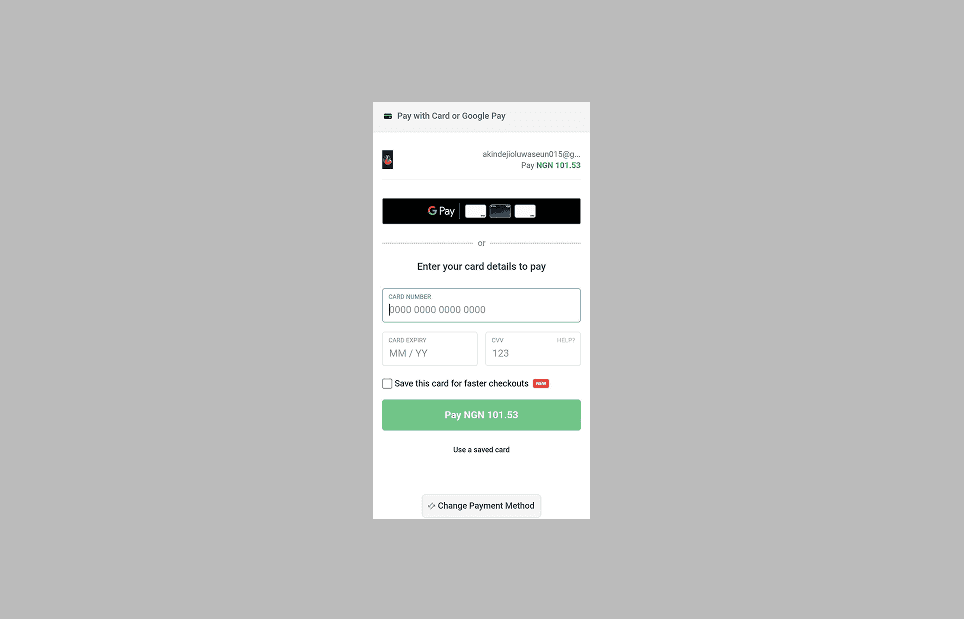
The checkout method detects whether the customer's browser supports Google Pay. If it does, Paystack surfaces the Google Pay button automatically in the card section of the Checkout as shown below:
Mounting a payment request button
This method lets you place the Google Pay button on your own page, in line with your design. Apple Pay mounts into the same container, so a customer gets whichever wallet their device supports.
Compatibility
The payment request button requires @paystack/inline-js version 2.26.0 or later. If you load InlineJS via CDN, you already have this. If you installed it with a package manager such as npm, yarn, or pnpm, upgrade before you start.
Mounting the button is a four-step process:
- Set up your Google Pay merchant profile
- Add your merchant details to the Dashboard
- Create a container
- Set up the payment request
Set up your Google Pay merchant profile
Google validates the origin serving the button against a registered merchant profile. The Checkout runs on Paystack's profile, but a button on your own domain needs yours, so set one up before you go any further.
Follow Google's official guides to create and publish your integration:
- Set up your Google Pay integration: create your Google Pay & Wallet Console account and configure your integration. Aim for a
WEBandGATEWAYintegration. - Publish your integration: move your integration out of
TESTand intoPRODUCTIONso it can process real transactions.
Add your merchant details to the Dashboard
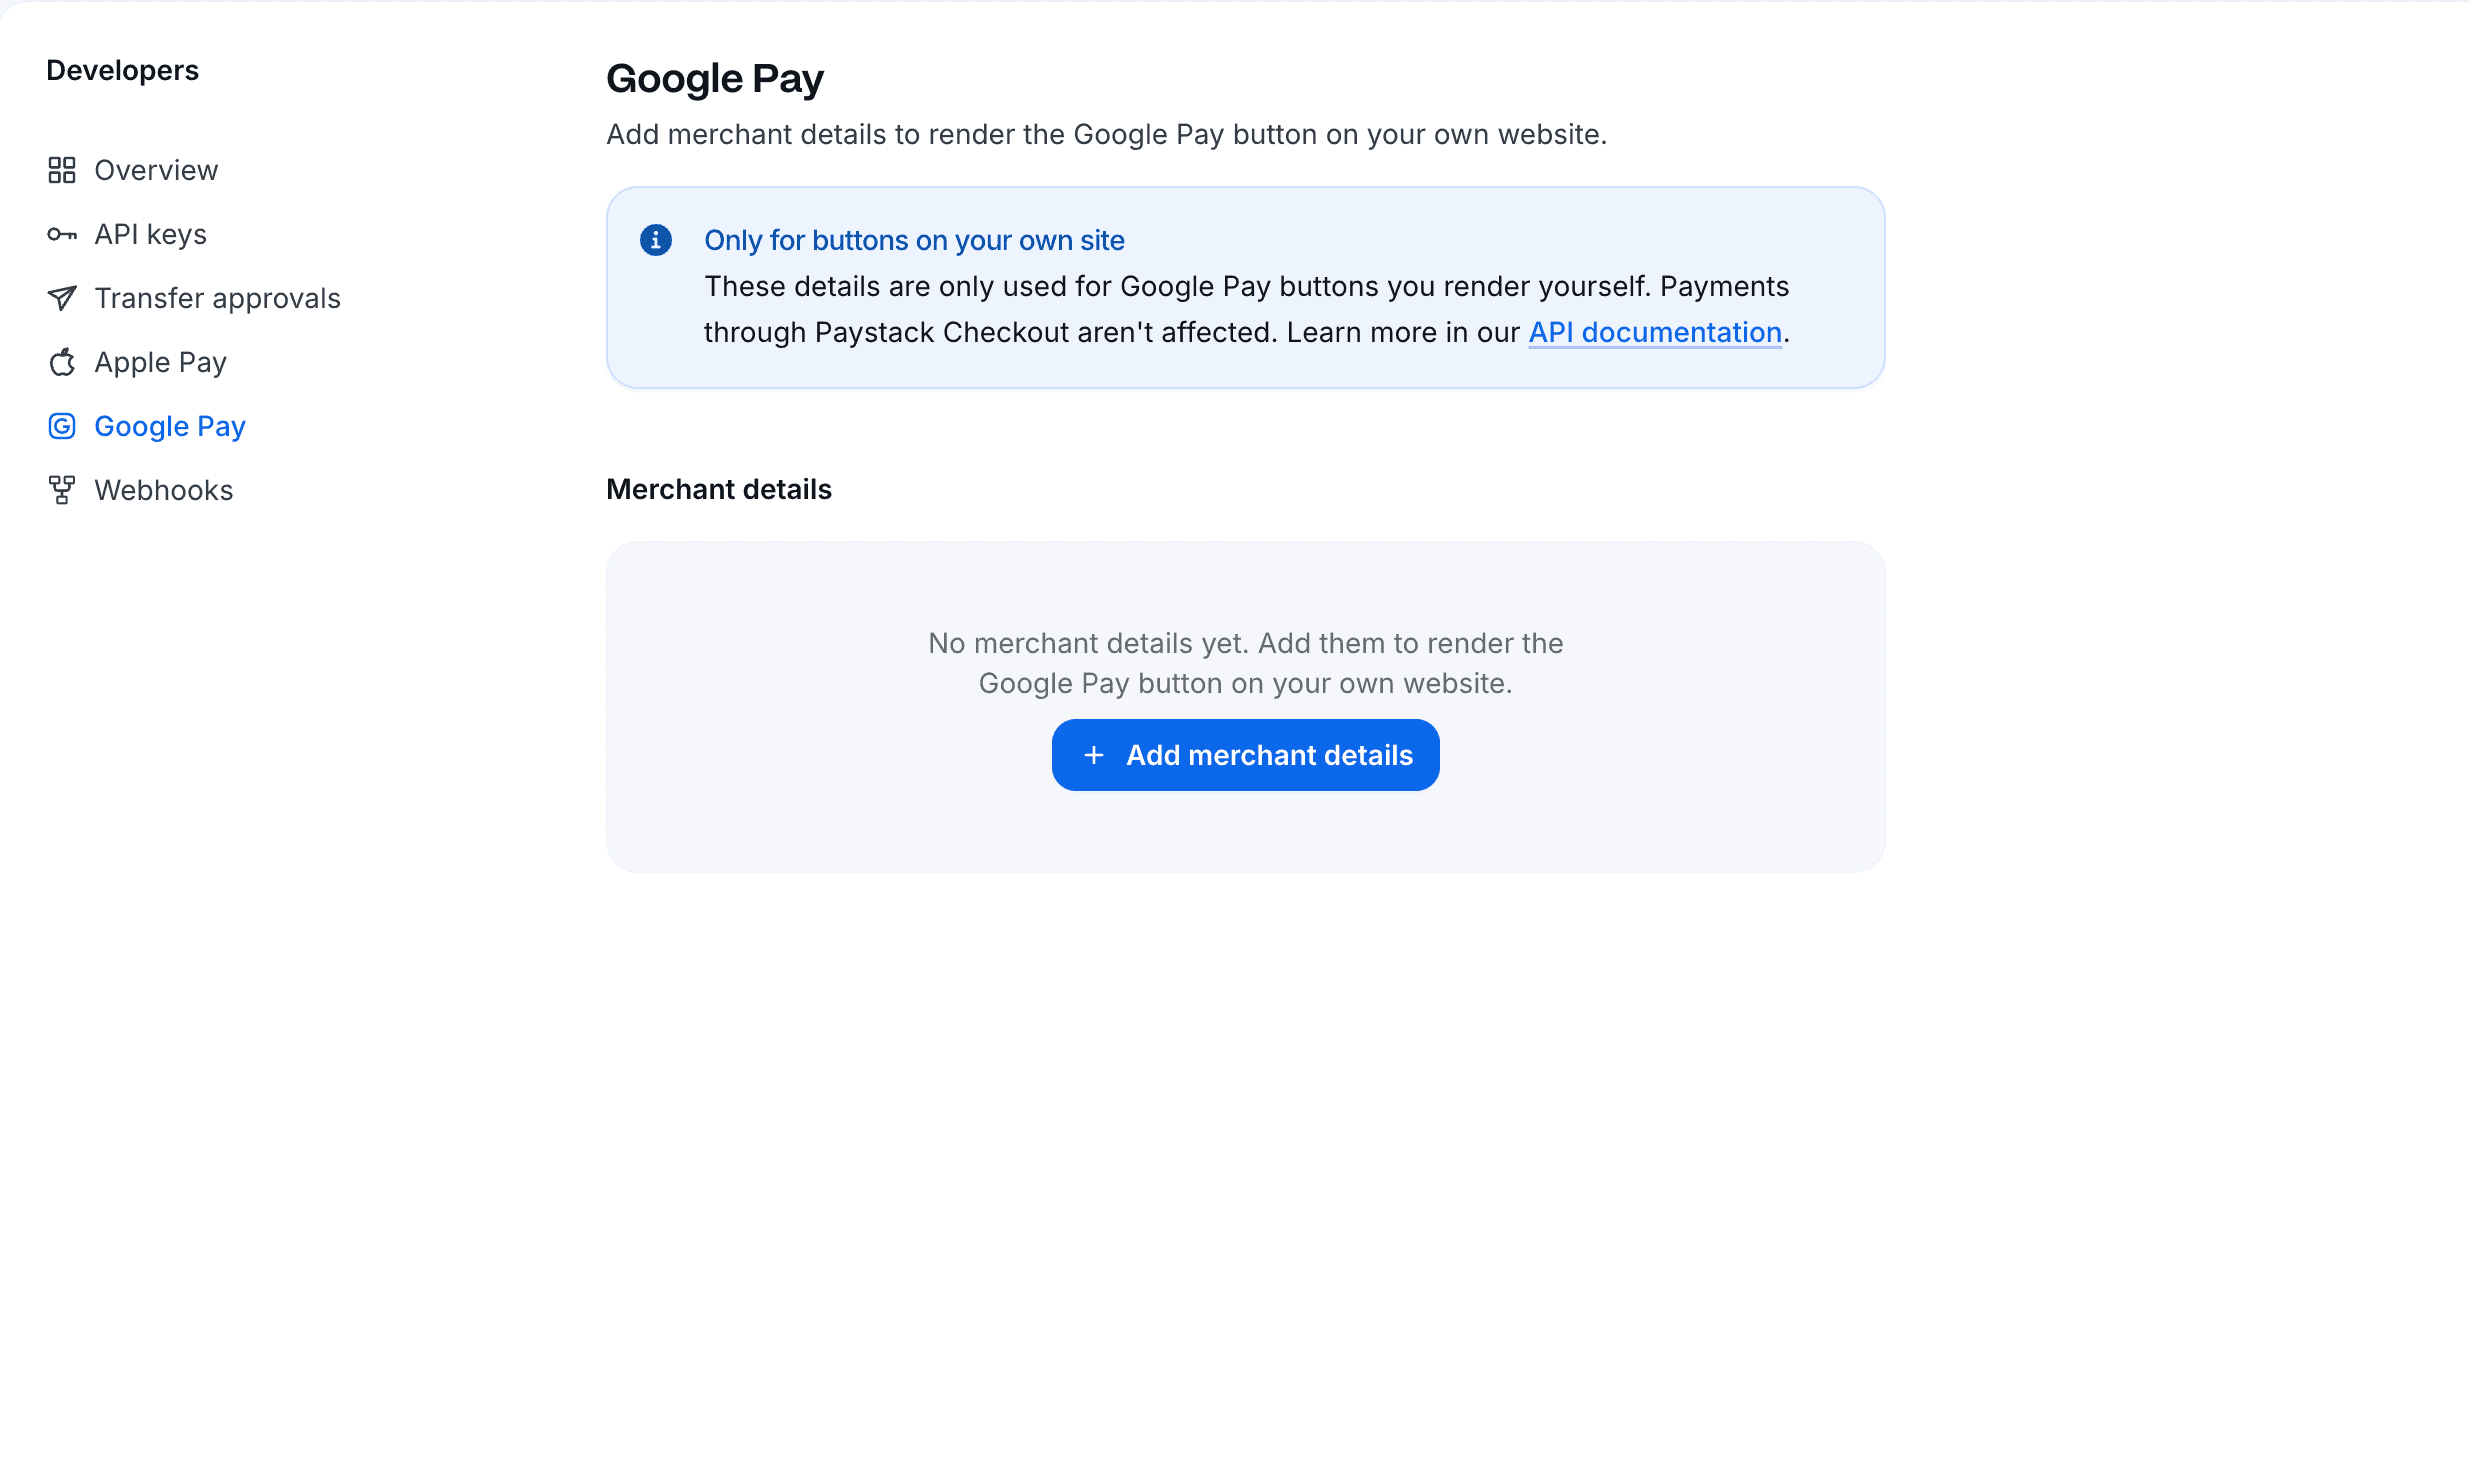
Once Google approves your integration, hand Paystack the details of the profile you just created. Go to the Developers page on the Paystack Dashboard, open the Google Pay tab and click Add merchant details.
Fill the form with the values from your Google Pay & Wallet Console:
Merchant ID: your production Google Pay merchant identifier, a 15-16 character string.Merchant name: the business name that appears on the Google Pay & Wallet Console.Website domain: the domain you registered with Google, and the domain that serves the button. These have to be the same.
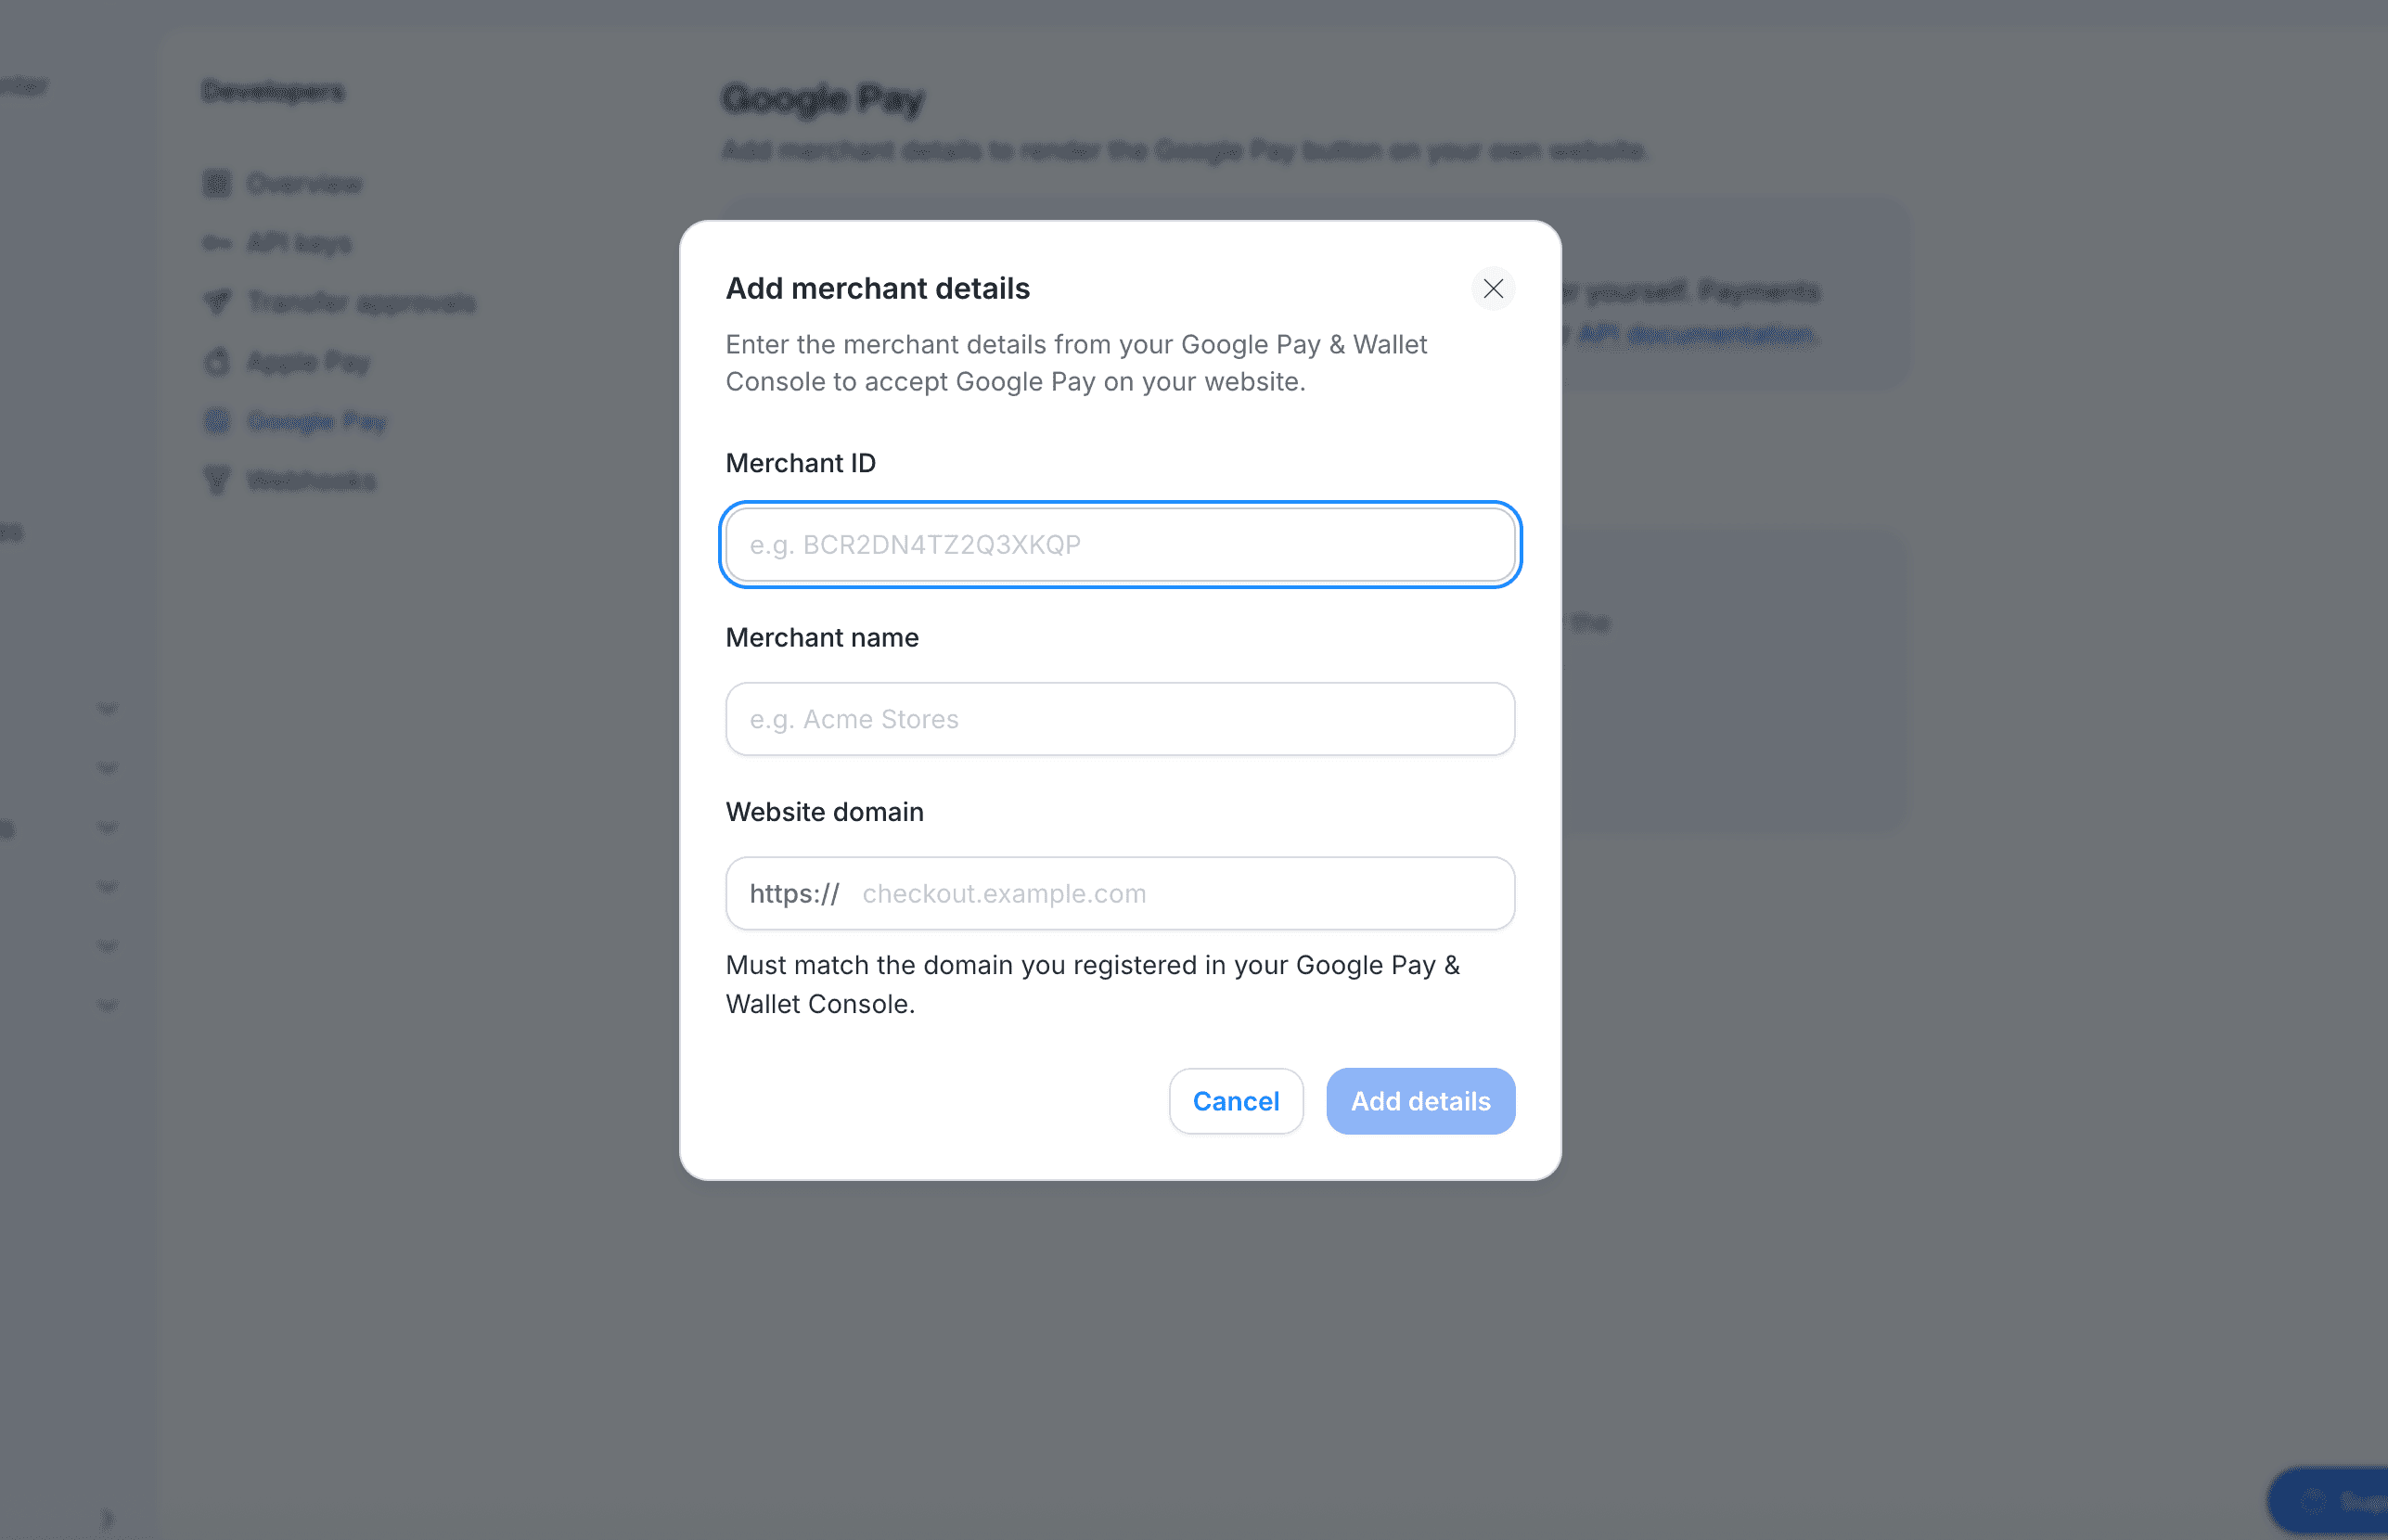
Paystack passes these to the Google Pay SDK when it mounts the button, so there's nothing further to configure in your code. They only apply to buttons you render yourself, and don't affect payments through the Paystack Checkout.
Create a container
Add the HTML tags that hold the wallet buttons, as well as the button to load other payment options:
1<!-- Wallet buttons, styles and event listeners will be injected to this div -->2<div id="paystack-wallet-buttons"></div>3<button id="paystack-other-channels">More payment options</button>
Use a div tag with a unique id for the container. The preceding snippet uses paystack-wallet-buttons, but you can use any name you prefer. This id is what you pass to the paymentRequest() method.
Set up the payment request
Pass the container id and the id for the other channels to the paymentRequest() method:
1const paystackPop = new PaystackPop();23await paystackPop.paymentRequest({4 key: 'pk_domain_xxxxx', // Replace with your public key5 email: 'example@email.com',6 amount: 10000,7 currency: 'NGN',8 channels: ['google_pay'],9 container: 'paystack-wallet-buttons', // ID of div to mount payment button elements10 loadPaystackCheckoutButton: 'paystack-other-channels', // ID of button to trigger opening Paystack checkout (optional)11 styles: {12 theme: 'dark',13 googlePay: {14 height: '50px',15 borderRadius: '3px',16 buttonType: 'pay'17 }18 }, // custom styles for button elements19 onSuccess(transaction) {20 console.log('Transaction: ', transaction)21 },22 onError(error) {23 console.log('Error: ', error)24 },25 onCancel() {26 console.log('Payment cancelled!')27 },28 onElementsMount(elements) { // { applePay: Boolean, googlePay: Boolean } or null29 if (elements && elements.googlePay) {30 document.querySelector('#paystack-other-channels').innerText = 'More payment options'31 }32 }33});
See paymentRequest(options) in the InlineJS reference for the full list of styling options.
Authorization methods on your own domain
The payment request button only offers CRYPTOGRAM_3DS. PAN_ONLY isn't available on your own domain.
The button only renders when all of the following hold:
- Your page is served over HTTPS from the same domain as the
Website domainsaved on your Dashboard. A mismatch is the most common reason the button goes missing. google_payis listed inchannelsalongsidecard. On its own, the transaction won't initialize.- The customer's card is stored as an Android device token, which in practice means an Android device with a card saved to Google Wallet.
Building a custom Google Pay checkout
Prerequisites
This option needs the same Google Pay merchant profile as the payment request button, so set that up first. You can skip adding the details to the Dashboard, since you pass them in your own code rather than having Paystack pass them for you.
Take this route if you want Google Pay on your own website and need both authorization methods, CRYPTOGRAM_3DS and PAN_ONLY. The payment request button only offers CRYPTOGRAM_3DS. Driving the Google Pay SDK yourself also reaches customers whose cards are saved to a Google Account but not device-tokenized, the PAN_ONLY case.
In exchange, you build the PaymentDataRequest, charge the token yourself, and render the 3DS step-up that PAN_ONLY charges return.
Use the following from the Google Pay & Wallet Console in the merchantInfo object when you initiate checkout:
merchantId: your production Google Pay merchant identifier (typically a 15-16 character string, for exampleBCR2DN7T...). Visible on your Google Pay & Wallet Console.merchantName: the business name that appears on the Google Pay & Wallet Console.merchantOrigin: the origin for your web integration as registered with Google.
Request parameters
Ensure your PaymentDataRequest supplied to Google Pay conforms to the parameters shown in the code snippet below.
Using Google Pay SDK
When using the Google Pay SDK, you build the PaymentDataRequest with the following defaults:
1{2 "apiVersion": 2,3 "apiVersionMinor": 0,4 "allowedPaymentMethods": [{5 "type": "CARD",6 "parameters": {7 "allowedAuthMethods": ["CRYPTOGRAM_3DS", "PAN_ONLY"],8 "allowedCardNetworks": ["VISA", "MASTERCARD"],9 "billingAddressRequired": true,10 "billingAddressParameters": {11 "format": "FULL",12 "phoneNumberRequired": false13 },14 "assuranceDetailsRequired": true15 },16 "tokenizationSpecification": {17 "type": "PAYMENT_GATEWAY",18 "parameters": {19 "gateway": "paystack",20 "gatewayMerchantId": "YOUR_PAYSTACK_INTEGRATION_ID"21 }22 }23 }],24 "merchantInfo": {25 "merchantName": "YOUR_BUSINESS_NAME",26 "merchantId": "BCR2DN7TTCZK3ED6",27 "merchantOrigin": "www.business-website.com"28 }29}
Key values you should consider:
tokenizationSpecification.parameters.gateway: Paystack's registered Google Pay gateway identifier.tokenizationSpecification.parameters.gatewayMerchantId: your Paystack integration id from your dashboard.allowedAuthMethods: ['CRYPTOGRAM_3DS', 'PAN_ONLY']: both are enabled together so Paystack can serve every browser.allowedCardNetworks: ['VISA', 'MASTERCARD']: the card networks Paystack currently processes for Google Pay.billingAddressRequired: true: Paystack requires a full billing address (street, city, region, postcode, country) on every Google Pay charge. Phone number is not required. See the Google reference for theBillingAddressParametersshape.assuranceDetailsRequired: true: ensures Google Pay returns thecardHolderAuthenticatedsignal on the payment, which drives Paystack's downstream 3DS decision onPAN_ONLYtokens.
Charging a token
With your integration approved and the Google Pay button on your website, customers can interact with the button and select their preferred card. Google Pay then encrypts those card details into a token, which it forwards to Paystack (as the gateway selected under tokenizationSpecification) to decrypt and charge.
Charging an existing token uses the Google Pay Charge endpoint (googlepay/charge), but most integrations should route through Paystack's checkout instead.
This section documents the endpoint for completeness.
Send the payload as application/x-www-form-urlencoded:
| Field | Required | Notes |
|---|---|---|
transaction | Yes | Paystack transaction id from Initialize TransactionAPI. |
paymentObject | Yes | The full paymentData object returned by loadPaymentData(), JSON-encoded as a single form value. |
device | No | Device fingerprint, if you collect one. |
The response follows Paystack's standard charge response structure.
The list below shows the expected value of status and the meaning:
success: Paystack authorizes the charge inline. Typical forCRYPTOGRAM_3DS.auth: the charge requires a 3DS step-up. Typical forPAN_ONLY. Opendata.otpmessagein an iframe and subscribe to the Pusher channel3DS_<transactionId>, eventresponse, for the final result.failed: the card issuer declined the charge, or Paystack rejected the token.messagecarries a customer-safe reason.
Recurring transactions
Once Paystack authorizes a Google Pay charge, you can process subsequent merchant-initiated charges (Subscriptions, Recurring Charges) against the resulting authorization code, similar to recurring card charges. See Recurring Charges for the full flow.
Refunds
Google Pay refunds work identically to card refunds. Paystack supports partial refunds. See Refunds for how to create and manage a refund.
Troubleshooting
If you experience any issues with your Google Pay integration, ensure there wasn't an oversight during setup:
- Your server must serve all requests via HTTPS in production
- Google Pay is enabled on your integration under the Preferences page
- If you render the button on your own domain, your Google Pay merchant details are saved under Google Pay on the Developers page
If all checks out and you are still having issues with your Google Pay integration, here are some possible errors and resolutions you can try out:
| Error | Resolution |
|---|---|
| Merchant's Category not supported for Google Pay | For compliance reasons, Paystack allows only specific business categories to use Google Pay. Please reach out to support@paystack.com for more information |
| Invalid Google Payment Data Received | The paymentObject sent to /googlepay/charge is missing required fields or has malformed data. Escalate this to techsupport@paystack.com with the payload sent to this endpoint. |
DEVELOPER_ERROR or MERCHANT_ACCOUNT_ERROR from the Google Pay SDK | Google rejected the merchant identity behind the button. Confirm your integration is published in the Google Pay & Wallet Console, and that the Website domain you saved on the Dashboard is the domain serving the page. |
| Merchant identifier mismatch | The gatewayMerchantId embedded in the Google Pay token doesn't match the Paystack integration id on the transaction. Confirm you generated both from the same Paystack integration. |
| An error occurred while processing request | Generic failure, Paystack failed to decrypt the token or the transaction lifecycle hit an internal error. Retry the charge; if the issue persists, contact Paystack Support with the transaction reference. |